¶ Pilots for Hire App
While the Pilots for Hire app is designed to be as straight-forward to use as possible, there may be still be some tips and tricks to learn. Continue reading to familiarize yourself with the app, and possibly learn something you didn't already know about the app!
¶ Getting Started
First, you will need to enroll your FsHub account into Aeroconomy (if you haven't already) to be able to do anything in Aeroconomy, including flying Pilots for Hire jobs.
Already enrolled? That's great! What next? Well, to get started flying Pilots for Hire jobs, you'll need to download the Pilots for Hire app. Once you have it downloaded, just open it up. No need to install anything.
¶ Logging In
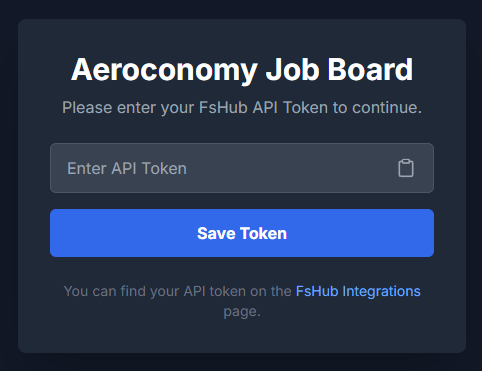
The Pilots for Hire app requires you to enter an FsHub API token to log in. This only needs to be done once. The app will automatically log you in from now on, until you choose to log out of the app.
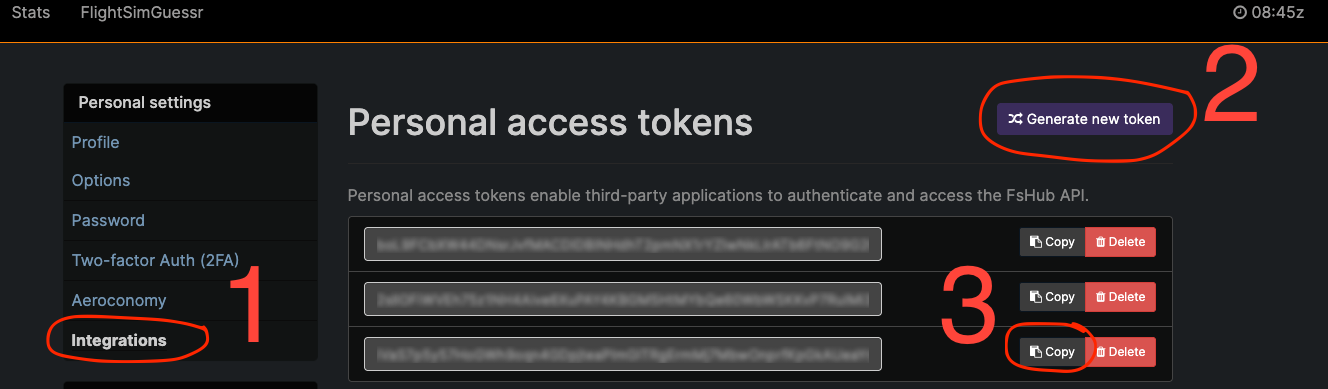
Click the link provided on the Enter API Token screen to be taken to your FsHub Integrations page to retrieve or create an API token. If you don't already have an API token on FsHub, creating one is easy. If you already have one created, simply copy one of your existing API tokens and paste it into the PFH app using the clipboard icon provided. Then click the Save Token button and the app will log you in.
¶ Job List View
Now that you're logged in, you will be presented with the Job List view. This is the primary page which you will use to browse, filter, accept and release Pilots for Hire jobs.
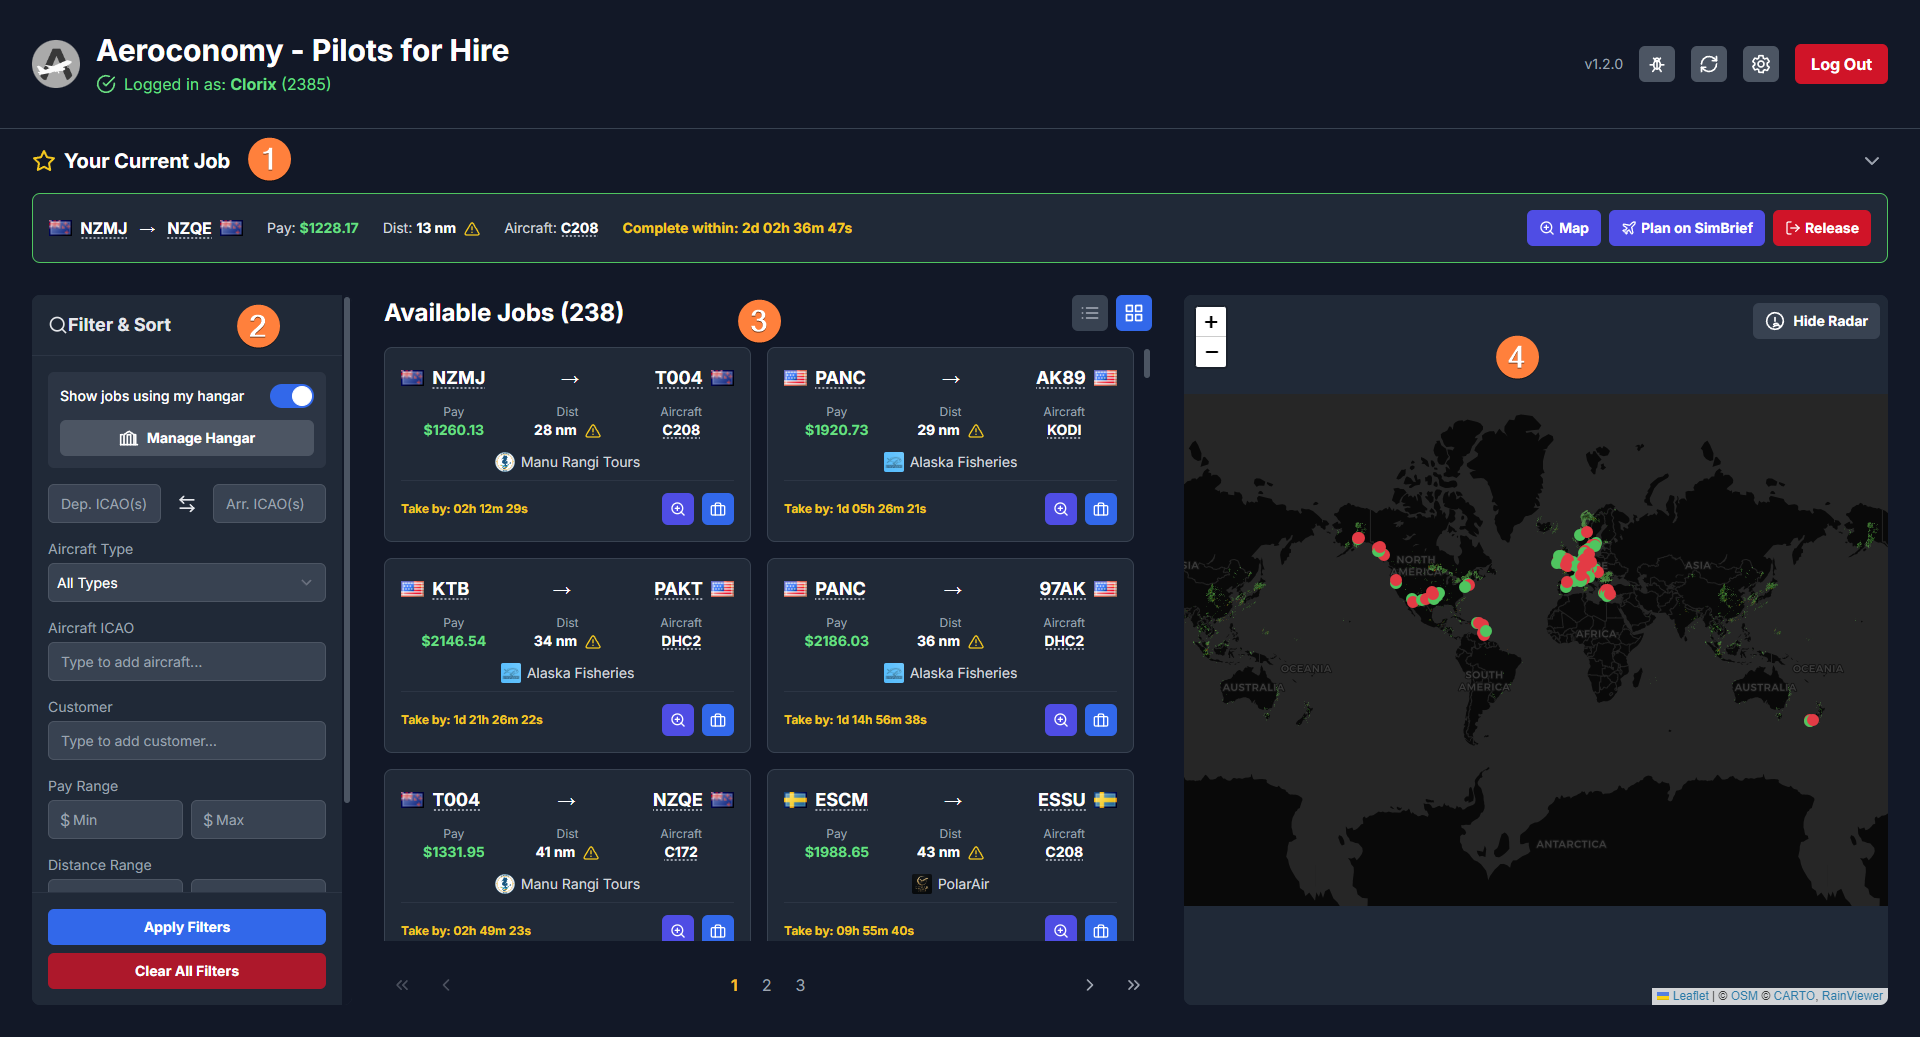
The Job List view consists of four main panels:
- Your Current Job: This panel displays your current job that you have accepted, along with all its details.
- Filter & Sort: This panel allows you to filter the job list and in what order the jobs appear.
- Available Jobs: This is where you will find all the available jobs according to your applied filters.
- Job Map: This map visually displays all the jobs currently shown on the page.
The top of the window also has a few helpful features.

- Aeroconomy Dashboard Link: Clicking the Aeroconomy logo will open a browser window to your Aeroconomy Dashboard page, where you can interact with the rest of Aeroconomy.
- Username: This shows that you are correctly logged in. The number in (parentheses) is your FsHub Pilot ID.
- Version: This displays the version of the PIlots for Hire app you are currently running. Clicking it will display the changelog. If you clicked Later when an update was found, you will also find a button to update the app below the changelog.
- Debug Current Job: This button will display some helpful debug information about your current job. FsHub/Aeroconomy staff may request this information when assisting with any issues you may experience with completing Pilots for Hire jobs. Note: The debug button will only be active while you have an active job.
- Refresh Data: Clicking this will refresh the page to display the most up-to-date job information.
- Settings: Opens the Settings window where you can further customize the app's behavior.
¶ Your Current Job
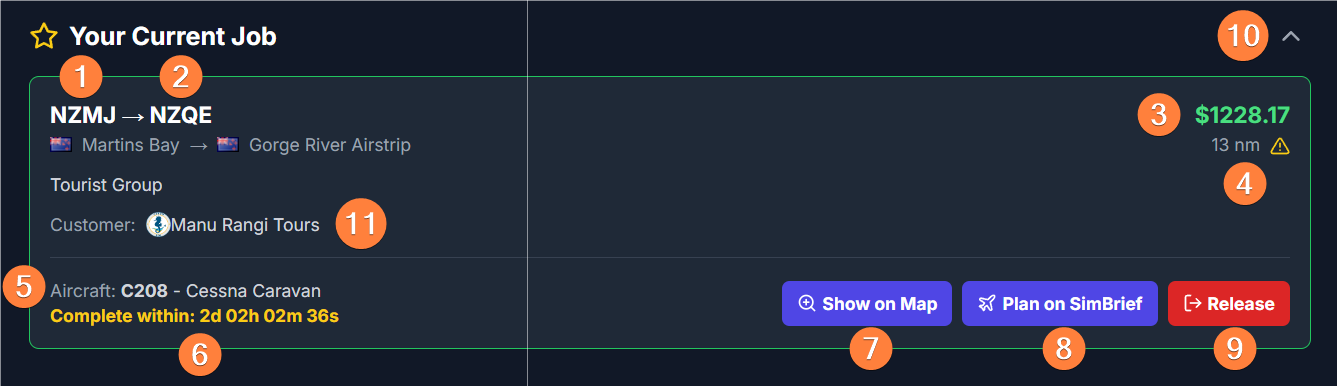
If you have accepted a Pilots for Hire job, you will see it in the Your Current Job panel. This panel shows the job's information, as well as a few useful buttons.
The app checks the job's status every 30 seconds. If you complete the job, you should notice that it is automatically removed from the screen within 30 seconds. If it hasn't been removed within 30 seconds of completing it, click the Debug icon in the top-right corner of the app. It may help in determining why the job wasn't completed.
The Pilots for Hire app does not need to be kept open during your flight. You can close it after accepting a job if you wish.
The Current Job card has two view modes: Expanded, and Collapsed. Expanded mode is great for seeing all the job's information at once. Collapsed mode is great for displaying just the most important information while allowing for more space to display other jobs.
Expanded Mode
Collapsed Mode

- Departure Airport: The airport you must depart from. Click the ICAO code to open that airport's info on FsHub. Shift+Clicking the ICAO code quickly applies a filter, using that ICAO as the departure ICAO.
- Arrival Airport: The airport you must arrive to. Click the ICAO code to open that airport's info on FsHub. Shift+Clicking the ICAO code quickly applies a filter, using that ICAO as the arrival ICAO.
- Base Pay: The amount of Aeroconomy money to be paid out for completing this job. Bonuses may be applied after the job has been completed. Check your recent transactions in your Aeroconomy Banking page to check for bonuses!
- Job Distance: The direct-to distance for this job.
- Required Aircraft: This is the aircraft you are required to fly to complete the job. The aircraft type must match exactly (i.e. you cannot fly an A320 in place of an A20N). You can submit an aircraft change request for the flight on FsHub if your aircraft was not correctly detected automatically. Shift+Clicking the aircraft quickly applies a filter to show only jobs requiring that aircraft.
- Complete Within Timer: The amount of time you have to complete the job. Taking the job will add 48 hours to the original expiration timer to give you plenty of time to complete it. If you release the job with more than 48 hours remaining on this timer, the job will be returned to the list, minus the extra 48 hours. If you release it with less than 48 hours remaining, the job will immediately expire and can't be taken again unless it comes up again in the future.
- Show on Map: Displays the job route on the map. Click the blue "Show All Page Jobs" button on the map to return to return to the normal map view.
- Plan on SimBrief: This opens SimBrief with the flight's details (departure and arrival airports, and aircraft) already entered for easy flight planning.
- Release: Releases the current job back into the job list. If less than 48 hours remain to complete the job when you release it, it will immediately expire and can't be taken again unless it comes up again in the future.
- Expand/Collapse: Click this to switch between the Expanded and Collapsed view modes.
- Customer Information (Expanded mode only): Shows the customer hiring for this job, as well as a very brief job description. Click the customer name to view a little more information about that customer (an optionally only show jobs from that customer). Shift-Clicking the customer name quickly applies a filter to show only jobs from that customer.
¶ Filter & Sort
The Filter & Sort panel allows you to filter the job list and customize in what order the jobs appear.
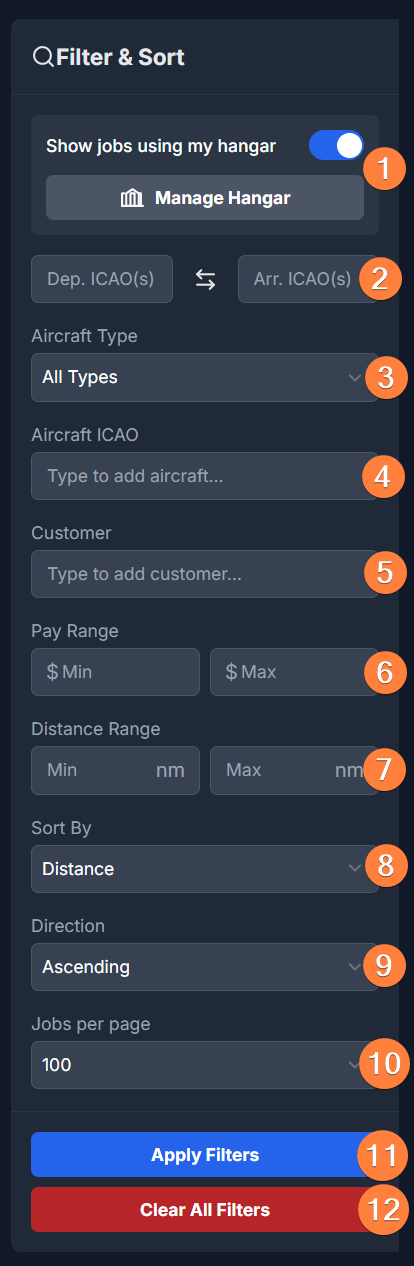
- My Hangar: Filters the job list to show only those jobs for which you have selected aircraft. See the My Hangar section of this guide to learn more.
- Dep/Arr ICAO(s): Enter one or more ICAOs into the departure and/or arrival ICAO fields to filter the job list to show routes to and from any of the specified ICAOs. Use the swap button in the middle to swap the departure and arrival ICAO fields.
- Aircraft Type: Select an aircraft type (Jets, Turboprops, Pistons, Seaplanes, or Helicopters) to view jobs requiring aircraft of only that type.
- Aircraft ICAO: Searchable list of all Aeroconomy-ready aircraft types. Select one or more to filter the job list to show only jobs requiring any of your selected aircraft.
- Customer: Searchable list of customers. Select one or more customers to filter the list to show only jobs from the selected customers. This is useful if you enjoy flying for particular customers, or you know the specific customers you want to fly for.
- Pay Range: Filter jobs that pay a minimum and/or maximum amount of Aeroconomy money.
- Distance Range: Specify a minimum and/or maximum job distance.
- Sort By: Sort the job list by Posted Date, Pay, Distance, Aircraft, or Expiration.
- Direction: Choose whether the jobs are sorted Ascending (low-to-high) or Descending (high-to-low) based on the Sort By option.
- Jobs per page: Choose the number of jobs you see per page (10, 20, 50, or 100). This also affects the number of routes displayed on the map.
- Apply Filters: Applies the filters you've set.
- Clear All Filters: Clears all filters (does not affect My Hangar, Sort By, Direction, or Jobs per page settings).
¶ Available Jobs
This panel is where you'll find the list of jobs available to take. The jobs displayed in the list is affected by the Filter & Sort panel options.
Grid View
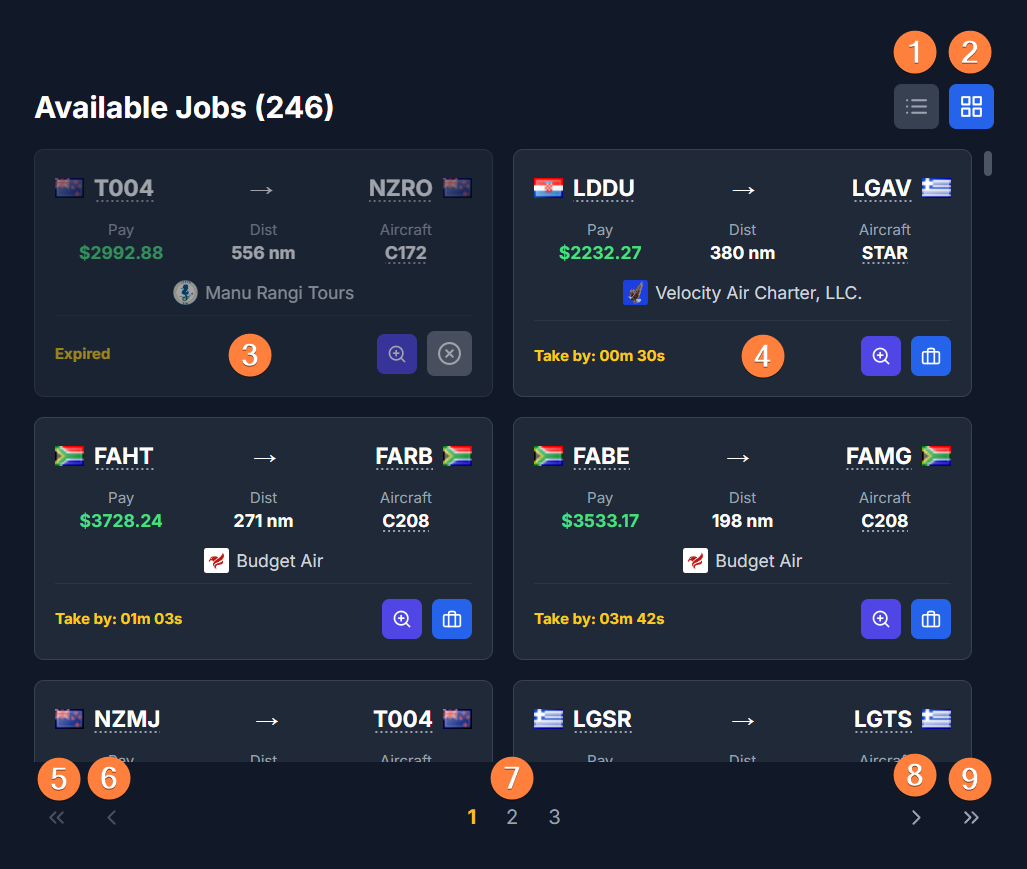
List View
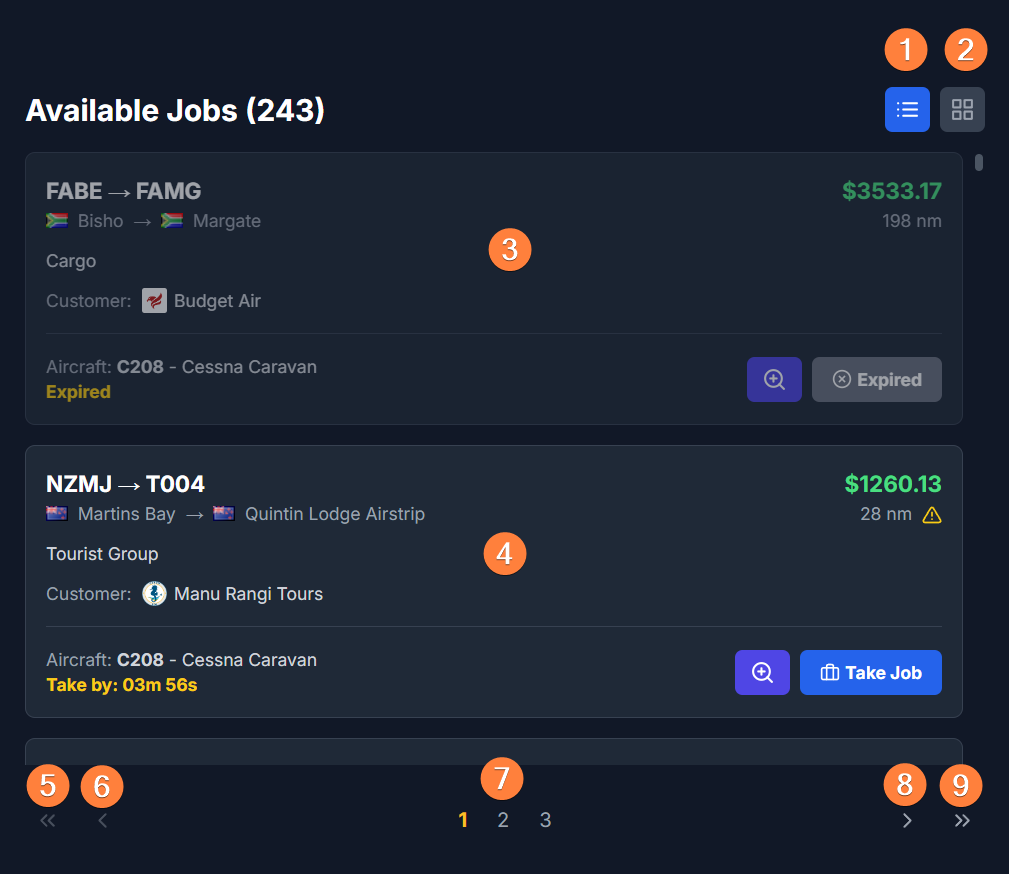
- List View Toggle: Display the job list in List View mode.
- Grid View Toggle: Display the job list in Grid View mode.
- Expired Job: Jobs that have expired will appear slightly dimmed and won't allow you to take the job.
- Available Job: This is an example of an available job. Click the Take Job button to accept it before you fly it!
- First Page: Quickly jump to the first page.
- Previous Page: Go to the previous page.
- Page Selector: Allows you to quickly page through multiple pages at once by selecting a specific page to view.
- Next Page: Go the next page.
- Last Page: Quickly jump to the last page.
Jobs with a short distance (80nm or less) will display a yellow ⚠️ caution icon next to the distance to remind you to allow LRM to log short flights. You can click the icon for more information on how to do this.
¶ Job Map
The job map allows you to visualize all the jobs on the current page as well as live, real-world weather radar.
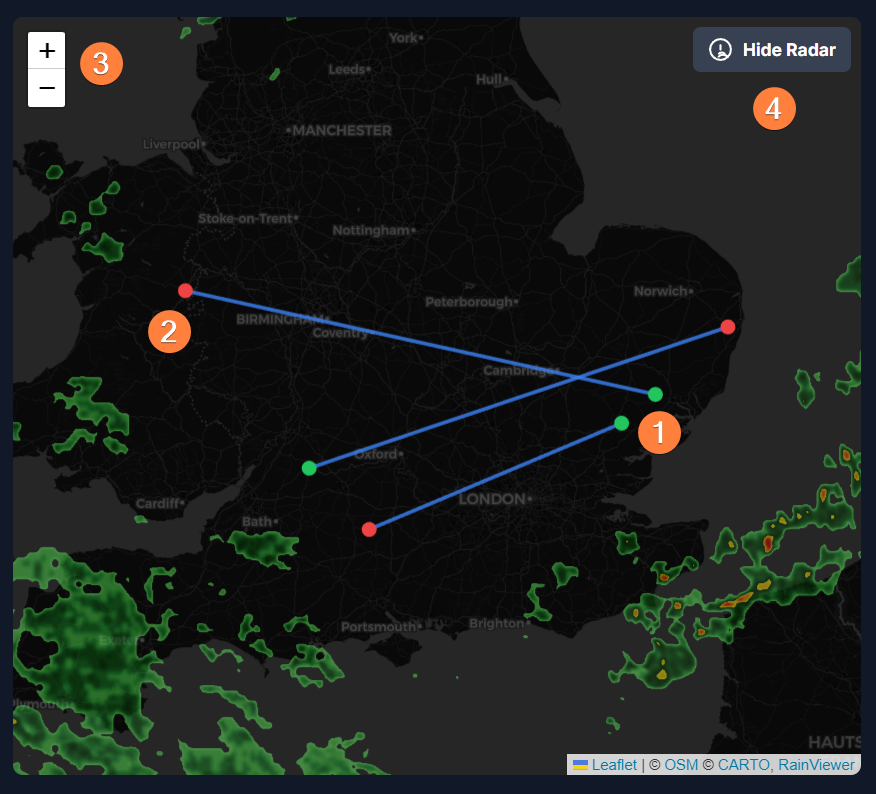
- 🟢Departure Airport: Click a departure airport dot to show only those jobs on the current page that depart from the clicked airport. Click the yellow Clear Map Selection button to return to the full job list. Shift+Clicking a departure airport dot will quickly apply a filter to show ALL available jobs departing from that airport.
- 🔴Arrival Airport: Click an arrival airport dot to show only those jobs on the current page that arrives at the clicked airport. Click the yellow Clear Map Selection button to return to the full job list. Shift+Clicking an arrival airport dot will quickly apply a filter to show ALL available jobs arriving at that airport.
- Zoom In/Out
- Show/Hide Radar: When the radar is enabled, it will automatically update as needed.
In addition to the above, clicking a blue line connecting airports will show jobs on that page that depart and arrive to those specific airports. Shift+Clicking a line will quickly apply a filter to show ALL available jobs matching both the departure and arrival airports.
You may also see a blue Show All Page Jobs button or a yellow Clear Map Selection button. These will appear if you click the Show on Map button on any job card. Click this button to return the map to its normal view.
¶ Job Details View
Clicking any job card will open that job in the Job Details view. This view displays the job's information at the top, as well as airport, weather, and runway information to aid in deciding whether to take that job or plan your flight.
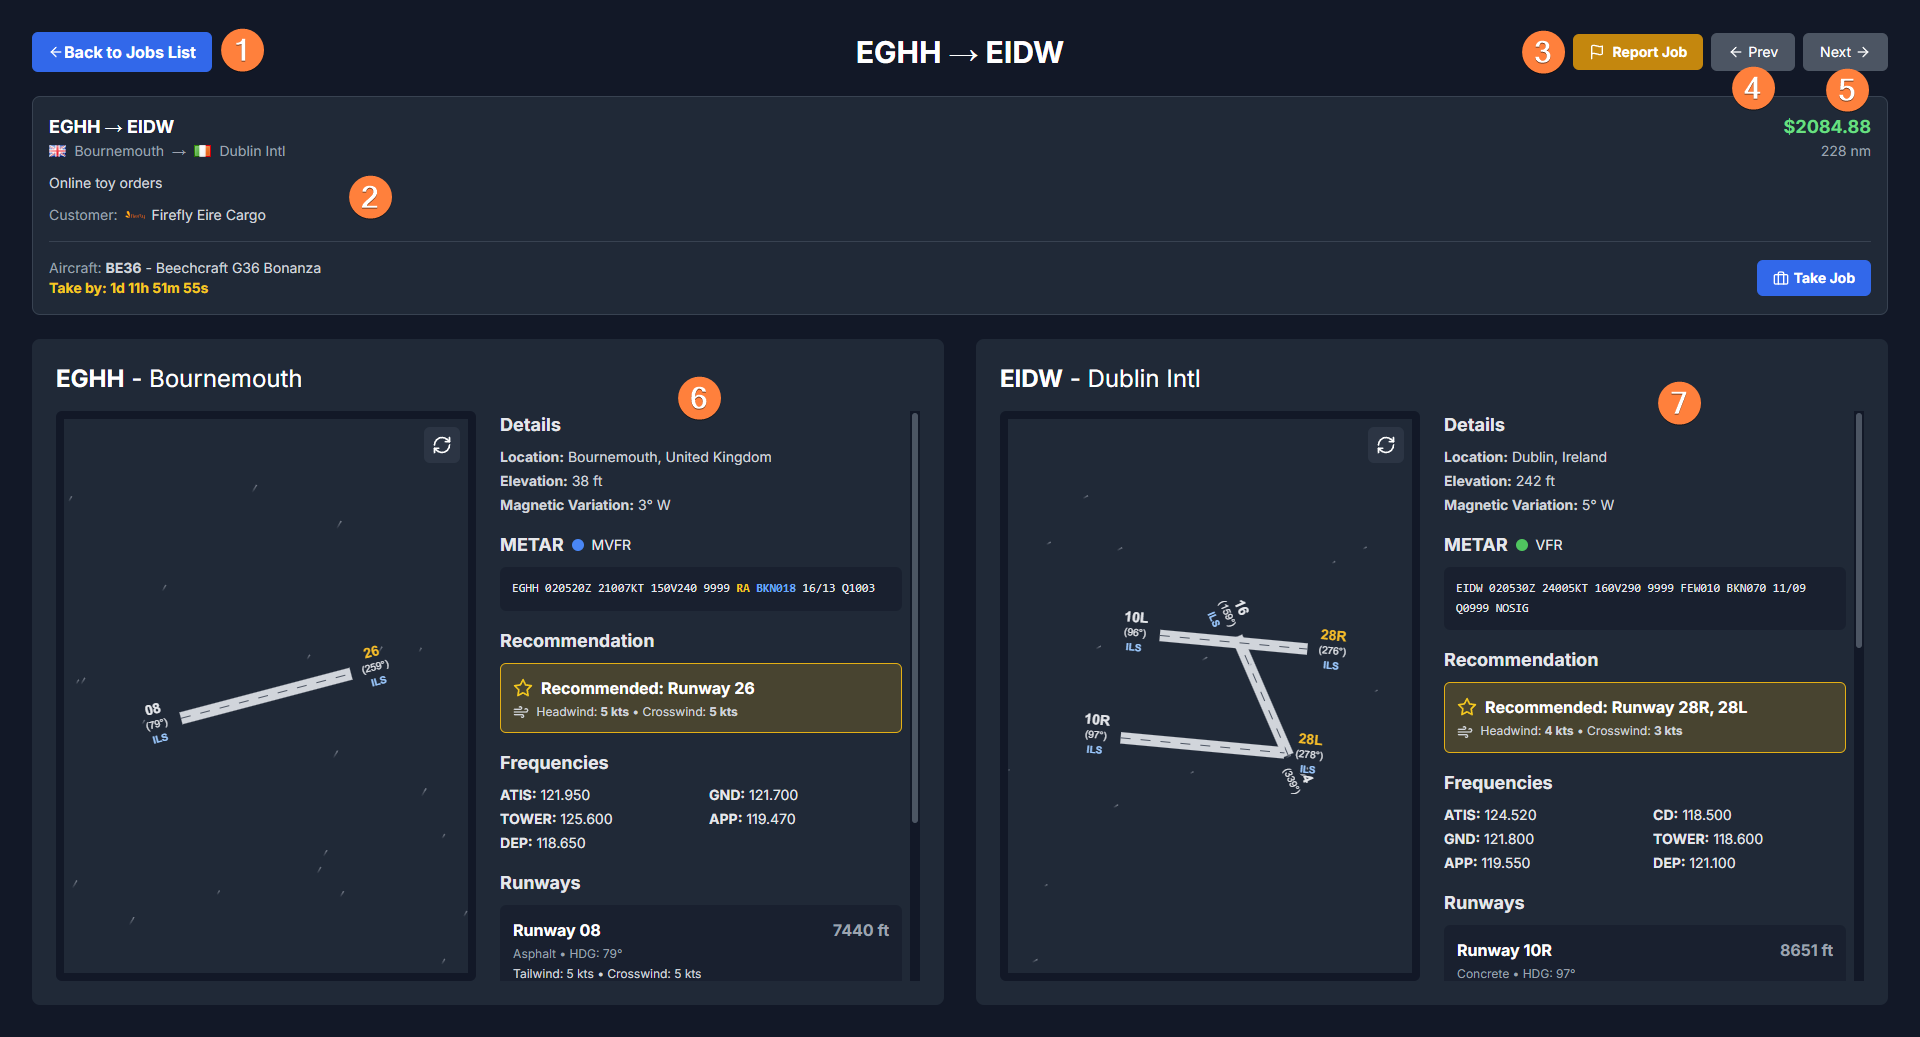
- Back to Jobs List: Click to return to the job list.
- Job Details: The details of the job being viewed.
- Report Job: If you notice an issue with a particular job, you can use this button to send us a report. Include a brief description of the issue.
- Previous Job: View the previous job from the list. This button will not appear if you're viewing your current job.
- Next Job: View the next job from the list. This button will not appear if you're viewing your current job.
- Departure Airport Information: The left airport panel displays the departure airport's information, including weather and runway info. See the Airport Information Panels section below for more details.
- Arrival Airport Information: The right airport panel displays the arrival airport's information, including weather and runway info. See the Airport Information Panels section below for more details.
¶ Airport Information Panels
When viewing a job in the Job Details view, you can also see some useful information about the airports (if the information is available on FsHub).
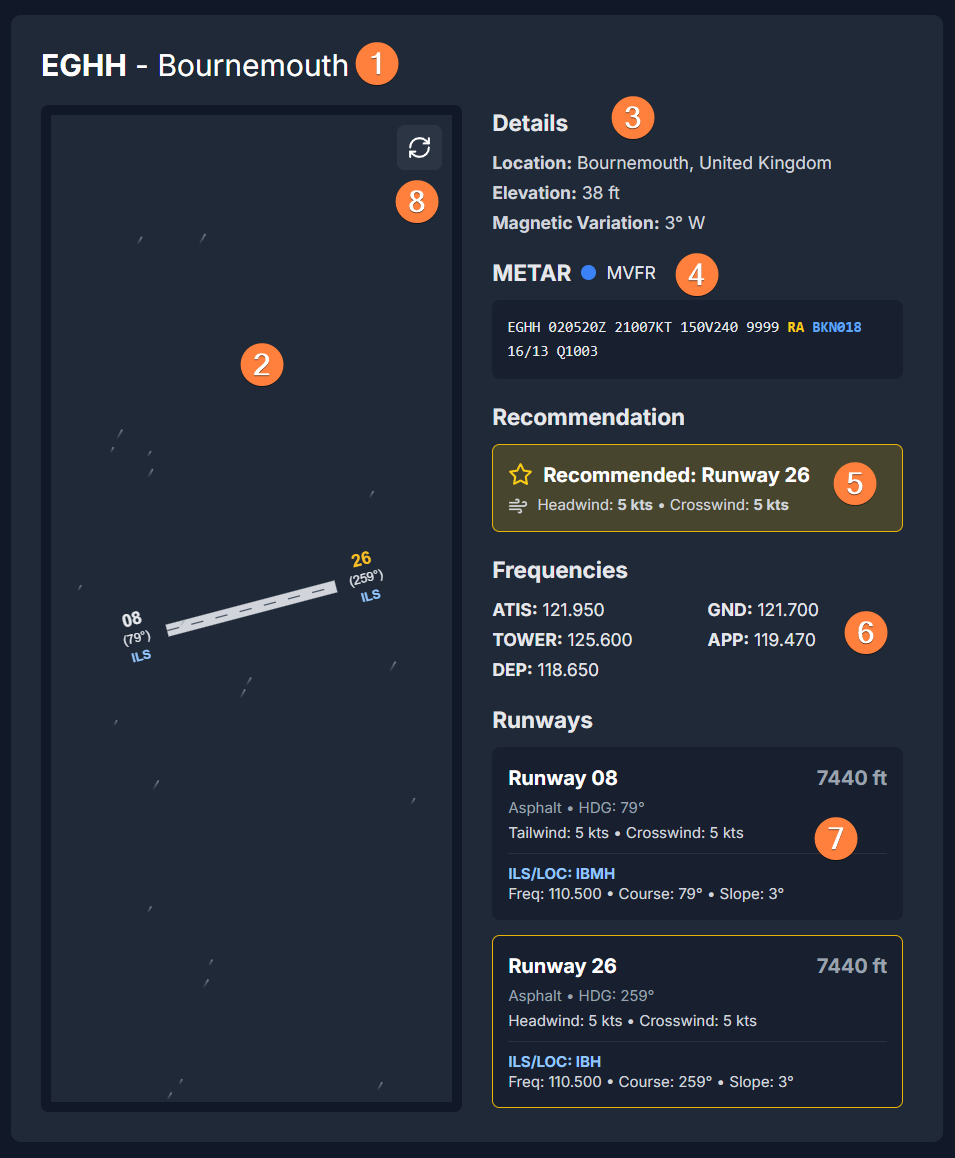
- Airport ICAO & Name: Displays the airport's ICAO and name. Click the ICAO to view the airport on FsHub.
- Airport Diagram: Dynamic, pannable and zoomable diagram of all airport runways. Each runway end includes the runway designator, magnetic heading, and a blue ILS flag if that runway has an ILS approach. Click a runway designator to highlight that runway in the Runway Information section (7) to view more details for that runway. The diagram also displays a wind animation. The direction and speed of the wind animation depends on the wind speed and direction as reported in the airport's METAR. Zoom the map using your mouse scroll wheel, and pan by dragging your cursor on the diagram. Double-click anywhere within the diagram to reset the view.
- Airport Details: Displays miscellaneous airport information, including its location, elevation and magnetic variation.
- METAR: Displays the latest METAR and the current flight rules category (🟢VFR, 🔵MVFR, 🔴IFR, 🟣LIFR). The app will try to highlight the limiting factor(s) in the METAR text as well as highlight any weather phenomenon (such as precipitation, strong winds, gusting winds, etc.) to be mindful of.
- Runway Recommendation: The app will attempt to recommend a runway to use for takeoff/landing.
- Frequencies: Displays a list of comm frequencies as listed on FsHub. Always check the most up-to-date data as these may have changed.
- Runway Information: Displays each runway and their relevant information. This information includes the runway designator, length, surface type, magnetic heading, headwind/tailwind component (if METAR is available), crosswind component (if METAR is available), and ILS/LOC identifier, frequency, course and slope (if available). A runway outlined in gold denotes a recommended runway (5). A runway highlighted in blue denotes the runway you clicked in the airport diagram (2).
Regarding Runway Recommendations: Currently, the app primarily uses each runway's headwind component when recommending runways, so we recommend verifying a recommended runway is suitable for the required aircraft before committing to any particular runway! (How many times can we say "recommend" in one sentence?)
¶ My Hangar
The My Hangar feature, found at the top of the Filter & Sort panel, allows you to select any number of Aeroconomy-ready aircraft to use as a way to display only jobs matching any of those aircraft. These do not get reset when clearing all filters, and can easily be toggled off to view ALL jobs, regardless of the aircraft in your hangar.
The intended use of this feature to ensure that the app only shows you jobs that require aircraft that you have installed and available to fly in your simulator. However, another clever use case is if you have a set of aircraft you really enjoy flying, you can select those in My Hangar. Then, toggling the My Hangar feature on will allow you to more quickly get into the sky if you know you want to fly one of those specific aircraft. Or if you're feeling a bit more adventurous, you can toggle it off to view all jobs if you want to see if a job is available for an aircraft you don't normally fly!
If you have no aircraft selected in My Hangar yet, attempting to toggle the feature will instead open the Manage My Aircraft Hangar window.
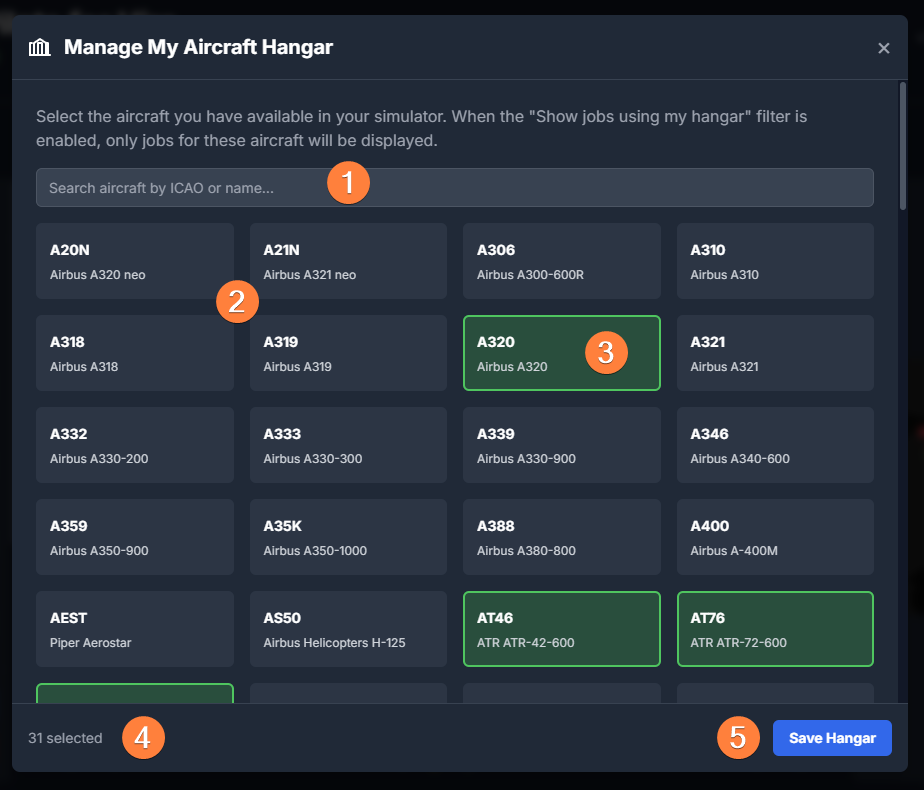
- Aircraft Search: Search for aircraft by ICAO type designator, or aircraft name.
- Aircraft List: Displays a list of all Aeroconomy-ready aircraft. Click one to select it. You may have any number of aircraft selected.
- Selected Aircraft: Aircraft you have selected as available in your hangar will appear in green.
- # Selected: Shows the number of aircraft you have selected in My Hangar.
- Save Hangar: Saves your aircraft selection.
¶ Settings
The Settings window shows options that allow you to further customize various aspects of the app. Currently, only one option is available.

Show "Plan on SimBrief" Button: When this is disabled, the Plan on SimBrief button will only appear on your Current Job card. If this is enabled, it will be displayed on ALL job cards, regardless of whether you've taken the job or not. This could be useful in helping you determine whether you want to fly a particular job without first needing to take the job.
Caution: Always make sure you have taken the job you're planning for before departing! This option is known to have caused some confusion where pilots think they have taken a job when in reality they have not.